
Before React, Vue, and other reactive JavaScript frameworks took over the front end development world, web developers practically lived by a single axiom based on the notion of separation of concerns:
Separate the content, markup, and styles.
There were many seemingly important reasons for this separation which was treated as canon in the web development world. Among them:
- separation is necessary for readability and maintainability
- separation leads to less code duplication
- separating CSS made styles cacheable by the browser
- separation allows for the same content to be styled in multiple ways
Then React and JSX came along and crushed the axiom of separation of concerns in one fell swoop. In essence, what JavaScript frameworks—along with many of the style tools like CSS-In-JS—are saying is:
Separation of concerns doesn’t matter. It all ends up in the browser anyway.
In fact, one of the prime motivators for all of the JS framework CSS tooling was to scope styles to their components. Svelte.js handles this out-of-the-box which is really nice.
Talk to a Shopify developer and they will tell you Shopify development is not much fun most of the time. In an attempt to make it a bit better, I’ve been trying to make little workflow improvements where I can that help smooth out the rough Shopify edges.
One of these rough areas is using SCSS in Shopify. The recommended way is to write your SCSS in a .liquid file so something like styles.scss.liquid. Then, Shopify will process that file and output the requisite .scss file, then output .css at runtime. That’s great if you need to use .liquid variables in your stylesheets but I don’t and wanted more control over the output and processing.
Don’t hate, encapsulate
After working with React and Svelte it made much more sense to me to keep my styles scoped to the components or files that need them rather then spread out across modules or breakpoints. Keeping everything encapsulated is actually easier to maintain than modular SCSS. And, it comes with the added benefit of each file or component only loading the styles it needs.
Sure, I could write regular ol’ css in <style></style> tags at the top of each .liquid file but then I can’t use all the goodies of SCSS. After you get used to nesting properties in SCSS, it is really hard to go back to CSS.
With that in mind, I wanted all the benefits of .scss: variables, nesting, mixins, yet the styles are scoped to the file that needs it. In other words, encapsulated with the file.
What if I could write styles in .scss but process it and append the processed css to a matching .liquid file in <style></style> tags at the top of the file?
It’s so crazy, it just might work!
But how to accomplish this feat? I never got into Gulp or Grunt but I would assume you could build something like that into your workflow with those tools.
But then it hit me: I’ve been using CodeKit for years with WordPress and absolutely love it. CodeKit’s Hooks feature might be just what I need. With a custom hook, maybe a bash script could take the outputted .css file and write it to a .liquid file.
I’m not a bash or shell scripting wizard by any means but hobbled something together that actually worked in about an hour. Needless to say I was pretty pleased. Read on to find out how I did it.
Prerequisites
For the purposes of this solution, I am using Quickshot which is a great Shopify local development tool but this will work with ThemeKit or Slate as well.
The first thing you will want to do is create a /styles directory in your local Shopify theme. Shopify will ignore anything that is not in a default theme directory so our /styles directory will be ignored which is perfect.
Your directory structure should look like this (notice the styles directory after snippets):
.
└── theme
    ├── assets
    ├── config
    ├── layout
    ├── locales
    ├── sections
    ├── snippets
    ├── styles
    └── templates
The basic pattern is, for every .liquid file you want to append styles to, you will create a corresponding .scss file with the same name. CodeKit will output a .css file with this filename as well which is important as you will see later.
For example, if you have a liquid file product-template.liquid you would create a new scss file with the same name but with the .scss extension: product-template.scss in your /styles directory.
Again, keeping these files in the /styles directory ensures that they are ignored by Shopify which is what we want.
CodeKit Setup
Import your top-level theme directory into CodeKit. Once imported, go to the file list of your project in CodeKit. On all of the directories except /styles, right-click the directory and select ‘Skip this folder’. You could also option-click multiple and then select ‘Skip selected folders’. CodeKit will ignore these files which is what we want.
Then, in CodeKit open up the /styles directory and select the product-template.scss file you created above and set the output options on the right hand panel:
Compiler: Dart Sass [default]
Output Style: Compressed [important so it is all on one line]
Other Options:
- deselect
Create a source map - deselect
Emit a @charset for non-ascii text
After Compiling:
Run Bless on the CSS file[optional]- select
Emit a @charset for non-ascii text
Output
- When This File Changes or Builds:
Compile It - To This Path:
/theme/styles/your-file.scss
Note #1: the default is to output to a /css directory but I like to keep all the styles together so I set this to the same directory for each file.
Note #2: you will need to set these options for every .scss file you add to your /styles directory each time unless you set these as the defaults in CodeKit.
Note #3: Option-Click each .scss file in your project to select multiple and set the options for all of your .scss files in one go! This is how I normally set it up for new projects and takes just a few seconds.
Hook Setup
Here’s the basic hook setup in CodeKit:

And here’s the script:
# Bash script for CodeKit hook to append processed css
# from scss file to liquid file.
#
# (make sure to use 'Compressed' for scss->css output
# in CodeKit so everything is on one line)
#
# To use:
# 1. create a `/styles` directory in your Shopify theme
# for your .scss files
# 2. name the .scss file the same name as the liquid
# file; e.g. sample.scss/sample.liquid
# 3. IMPORTANT: add empty `<style></style>` tags to first line of liquid file; add empty line below
# 4. add this script to your project in CodeKit in Hooks
# 5. profit
#
# NOTES:
# $CK_OUTPUT_PATH is the processed css file
# (provided variable from CodeKit)
#
# $CK_PROJECT_ROOT is the project root folder
# (another provided variable from CodeKit)
#
# get contents of css file
css=$(<$CK_OUTPUT_PATH)
#
# get filename without extension; save to FILE variable
s=$CK_OUTPUT_PATH
s=${s##*/}
FILE=${s%.css}
#
# set up our <style> tags
S1='<style>'
S2='</style>'
#
# concat css with <style> tags for output
DATA=$S1$css$S2
#
# search through project to find liquid file with same name as file
STYLEFILE=$(find $CK_PROJECT_ROOT -type f -name "${FILE}.liquid")
#
# replace first line of .liquid file with processed css in <style> tags.
# w00t.
#
{ printf '%s\n' "$DATA"; sed '1d' $STYLEFILE; } > tmp.liquid && mv tmp.liquid $STYLEFILE
Let’s go through this script in detail:
css=$(<$CK_OUTPUT_PATH)`
^^ Using the CodeKit-supplied CK_OUTPUT_PATH variable, we put the contents of the outputted css file into a variable, aptly named css.
s=$CK_OUTPUT_PATH
s=${s##*/}
FILE=${s%.css}
^^ Here we’re getting the outputted file path (our .css file), then getting the file name without the extension. Why? Now we have the file name to look for to append our css to.
S1='<style>'
S2='</style>'
^^ Here we set up our style tags to wrap the css data in.
DATA=$S1$css$S2
^^ We concatenate our <style> and </style> tags with the actual css in the middle and save to a variable DATA. This is the data we are appending to the file.
STYLEFILE=$(find $CK_PROJECT_ROOT -type f -name "${FILE}.liquid")
^^ We recursively search through the project directory using the CodeKit-supplied CK_PROJECT_ROOT to find a file with the same name as our css file which is stored in the FILE variable; save this matching file to the STYLEFILE variable.
{ printf '%s\n' "$DATA"; sed '1d' $STYLEFILE; } > tmp.liquid && mv tmp.liquid $STYLEFILE
^^ Finally, we write our DATA to the first line of the matching file (STYLEFILE) by creating a temp file, then overwriting the original file.
And that’s it! Your .liquid file now has scoped styles!
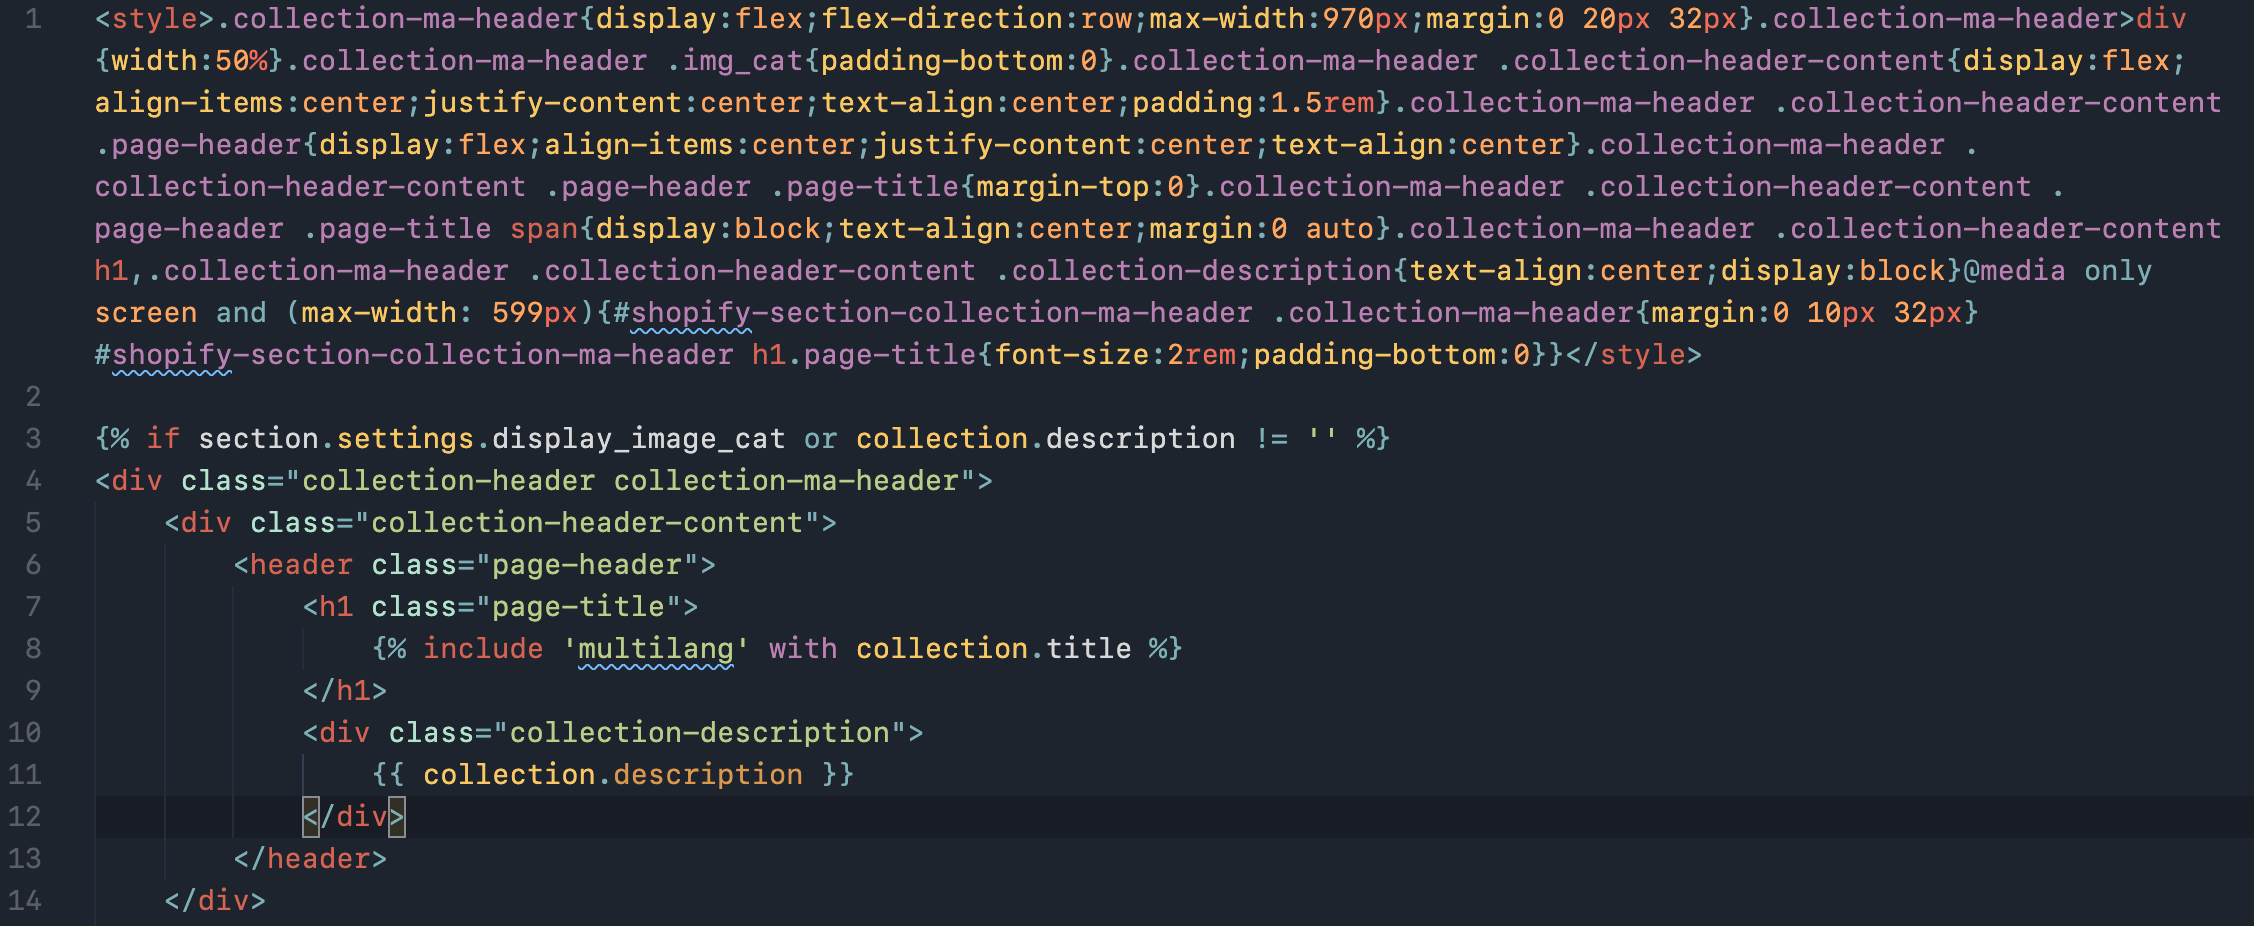
Here is some sample output from my collection-ma-header.scss to the collection-ma-header.liquid file:
If you’re using Quickshot’s theme watch --sync CLI command, whenever your .liquid file is updated with new styles, it will upload it to your synced theme.
Seeing this jumble of styles at the top of your file may seem a bit jarring at first but you get used to it pretty quick. Try it with one file and see if you like it. Now that I’m using this system, I’ll never go back.
Extending
With a little re-jigging the script to use .php as the extension instead of .liquid, I’ve gotten this hook working in a WordPress project.
You could even make the script more global by adding an EXT variable to store the extension and replacing that where .liquid is in the script.
More
One VSCode extension that has really helped with this workflow is Working Sets which allows you to group files in sets of your choosing for mini sub-projects within a project. I’m using it in my Shopify development to keep my scoped .liquid and .scss files together.