
In my last post ‘Porting My WordPress Site To GatsbyJS’ I discussed a bit about the motivation to move my site from WordPress where it had been for over a decade to GatsbyJS.
In this post, I’ll provide a detailed walkthrough to help migrating a simple WordPress site to a Gatsby site with some Markdown files as the data source. Hopefully, I can clarify some of the pain points that I ran into along the way to help your transition be a little smoother.
Note that this walkthrough does not cover using WordPress as your data source. For that, check out Plate for Gatsby — a ready-to-go Gatsby starter to grab the posts, pages and menus from an existing WordPress install.
We’ll build a home page, a posts page to list all of our posts with excerpts, create an individual post template, build out React components we can reuse in our posts and pages, and finally, add metadata to our posts and pages for SEO and sharing.
This tutorial assumes you are familiar with the command line and know how to use a text editor. You will also need to have node.js and npm installed as well as Git. Follow the links if you need to install any tools and circle back when you’re done.
Ok, ready? Let’s dive right in.
Install Gatsby
If you haven’t already, install the Gatsby command line tool globally:
npm install --global gatsby-cli
Create a new Gatsby site (change gatsby-site to whatever you want your site/project to be called). This will use the default Gatsby starter:
gatsby new gatsby-site
Change to your project directory:
cd gatsby-site
Start the Gatsby development server:
gatsby develop
You now have a hot-reloading development environment accessible by default at: http://localhost:8000. Open up Chrome with that URL.
If that doesn’t work right away (and sometimes it doesn’t), in your project directory, run npm install to make sure Gatsby has all the dependencies loaded and then try running gatsby develop again.
Visit or reload http://localhost:8000 and you should see the default Gatsby home page:

Start Editing
In your text editor, find and open src/pages/index.js in your project folder. This is the template for the home page we visited above.
Let’s make a simple edit to show off the hot reloading.
At line 11, change this:
<h1>Hi people</h1>
to:
<h1>Hello, world!</h1>
And then view your now updated site at http://localhost:8000. Any edits you make will now be updated on the site in real time.

Congrats! You made your first edit! And it works!
If you noticed your browser tab, it will look like this:

(don’t worry about the 8001: I’m running my example on that port.)
Let’s update that to make it a bit more personal. To do that, open up gatsby-config.js in your editor.
Change the title, description, and author fields to your site. We’ll use this data later to populate the site title. Be sure to keep the values in quotes.
module.exports = {
    siteMetadata: {
        title: 'My Awesome Site',
        description:
            "I'm redoing my site with GatsbyJS."
        author: '@myhandle'
    },
    //...
Notice I’m using double quotes for the description since I have a word with an apostrophe (single quote).
Let Gatsby Know Where Our Posts Are
Before we go any further, we need to tell Gatsby where to find our posts. Since we are using local files, we can use the gatsby-source-filesystem plugin which is already installed from the starter. What that plugin does is prepare Gatsby to handle and query files from anywhere within the project directory.
So, let’s create a directory to hold our posts in our project: in /src/, create a new directory called posts either from your text editor or command line.
mkdir posts
Your new directory should be here:
/your-project/src/posts/
We’ll leave it empty for now but this is where our Markdown files will reside.
Next, we need to tell the gatsby-source-filesystem plugin about our new folder so it can find our posts. For this (and all Gatsby plugins), we need to register the options in gatsby-config.js:
Add the gatsby-source-filesystem section as below:
module.exports = {
    siteMetadata: {
        title: 'My Awesome Site',
        description:
            "I'm redoing my site with GatsbyJS.",
        author: '@myhandle'
    },
    plugins: [
        'gatsby-plugin-react-helmet',
        {
            resolve: `gatsby-source-filesystem`,
            options: {
                name: `images`,
                path: `${__dirname}/src/images`
            }
        },
        {
            resolve: `gatsby-source-filesystem`,
            options: {
                path: `${__dirname}/src/posts`,
                name: 'markdown-pages'
            }
        },
        'gatsby-transformer-sharp',
        'gatsby-plugin-sharp',
        {
            resolve: `gatsby-plugin-manifest`,
            options: {
                name: 'gatsby-starter-default',
                short_name: 'starter',
                start_url: '/',
                background_color: '#663399',
                theme_color: '#663399',
                display: 'minimal-ui',
                icon: 'src/images/gatsby-icon.png'
            }
        }
        // this (optional) plugin enables Progressive Web App + Offline functionality
        // To learn more, visit: https://gatsby.app/offline
        // 'gatsby-plugin-offline',
    ]
}
We now have two option blocks for gatsby-source-filesystem: once for images and the one we just added for our Markdown posts.
You may be asking: why do we need to add these options? If you’re used to WordPress or another system where installing a plugin sets it all up for you, with Gatsby you have to register each plugin and explicitly set its options. In the end, this makes plugins much more flexible and allows you to customize the settings and options to your specific setup.
So, always remember that every Gatsby plugin you add you will have to register the options in gatsby-config.js. Note that you do not need to add any configuration options for regular React packages that you install via npm. Those you install as normal and can use in your components like always.
Exploring GraphQL
Gatsby uses GraphQL to query the data we’ll use for our site metadata, posts, and pages. If you’re not familiar with GraphQL or its syntax, visit the Gatsby docs on GraphQL to get acquainted.
In working with Gatsby you will often need to test out a GraphQL query against your data and see what comes back so that you can structure your queries properly. To do that you can use the built-in browser tool which is located at:
http://localhost:8000/___graphql
Fire that up in your browser and on the left hand window, copy and paste this into it:
{
    site {
        siteMetadata {
            title
            description
        }
    }
}
If you press the play button to send the GraphQL query, on the right hand side, you should get something like this:
{
    "data": {
        "site": {
            "siteMetadata": {
                "title": "My Awesome Site",
                "description": "I'm redoing my site with GatsbyJS."
            }
        }
    }
}
This is querying the actual data from our site — in this case the site metadata we put in our gatsby-config.js file. The beauty of this is this data can be queried and displayed anywhere in our site.
ProTip:
In the GraqhQL tool, at any point use
CNTRL-SPACEto see the available queryable fields.
Since we don’t have any posts yet, we need to create some.
Creating Posts
If you are moving your posts from WordPress, Markdown files can use regular old HTML so you can also just copy and paste the post html from WordPress into a .md file and save into the /src/posts/ directory.
Alternatively, you can create a few .md files as posts and put them in the /src/posts/ directory so that we have something to work with. You’ll need at least 6 posts to work with pagination.
Adding Frontmatter blocks
Our posts aren’t quite ready to be queried by Gatsby yet. We need to add what’s called frontmatter which is metadata about our post(s) that Gatsby can parse. To add frontmatter, we put in a block like this at the top of our Markdown file posts:
---
path: "/posts/my-first-post"
date: "2018-12-18"
title: "My First Post"
image: "../images/featured_image_01.png"
---
The dashes --- at the top and bottom are required and create a frontmatter block that Gatsby knows to parse independently from the post content.
This example shows some basic frontmatter fields that we can then query in Gatsby. Yet, you’re not limited to these fields! You can create your own frontmatter fields that you can use to send metadata to your posts or use to filter or sort queries. For example, you could add a field to your frontmatter called tags and add tags to your posts (or copy them from WordPress. The possibilities are endless.
At a minimum for this tutorial, you will need the path, date, and title frontmatter fields and although none are technically required, they will make it much easier to query and sort our posts. If you want to include a featured image for your posts, that’s how we are using the image frontmatter field above.
N.B: If not all of your posts have a value specified for a frontmatter field, you’ll need to check for that in your components/templates and return
nullif no value is present or else you’ll get an error.
Installing gatsby-transformer-remark
Gatsby needs the gatsby-transformer-remark plugin to be able to parse our Markdown post content and frontmatter. This plugin is only needed if you are working with Markdown files which we are so let’s install that now. From the command line in your project directory:
npm install --save gatsby-transformer-remark
And, as mentioned above about registering new plugins, we need to add an entry for gatsby-transformer-remark in our gatsby-config.js file below the gatsby-source-filesystem section:
    //...
    plugins: [
        //...
        {
            resolve: 'gatsby-source-filesystem',
            options: {
                path: `${__dirname}/src/posts`,
                name: 'markdown-pages'
            }
        },
        'gatsby-transformer-remark',
        'gatsby-transformer-sharp',
        //...
    ]
    //...
ProTip:
Whenever you add a new plugin to your Gatsby install, it’s a good idea to terminate the local server by using
CNTRL-Cin the shell where your Gatsby instance is running and then restarting it by typinggatsby developso that Gatsby can use the newly installed plugin.
Using createPages
One of the best features of Gatsby is being able to use any API made available to us from Node.js. The one API we are interested in here is the createPages API which we use in Gatsby to programatically create pages for each of our posts — in this case our local Markdown files.
Using this API, we can tell Gatsby what post data to query globally, and then what component or template to use to display individual posts. We do that in gatsby-node.js so open that up, delete the comments that are there and paste in this code:
const path = require('path')

exports.createPages = ({ actions, graphql }) => {
    const { createPage } = actions

    const postTemplate = path.resolve('src/templates/post.js')

    return graphql(`
        {
            allMarkdownRemark(
                sort: { order: DESC, fields: [frontmatter___date] }
                limit: 1000
            ) {
                edges {
                    node {
                        frontmatter {
                            path
                        }
                    }
                }
            }
        }
    `).then(result => {
        if (result.errors) {
            return Promise.reject(result.errors)
        }

        result.data.allMarkdownRemark.edges.forEach(({ node }) => {
            createPage({
                path: node.frontmatter.path,
                component: postTemplate,
                context: {} // additional data can be passed via context
            })
        })
    })
}
Ok, that’s a lot so let’s go through it section-by-section.
First, we’re requiring the helper path so that we can tell the createPages API where to find our template as seen here:
const postTemplate = path.resolve(`src/templates/post.js`)
Then, we are just making a GraphQL query using the syntax provided to us by the gatsby-transformer-remark plugin — in this case allMarkdownRemark which refers to all of our Markdown posts.
Gatsby knows where to find our posts because of our entry in gatsby-config.js which told Gatsby where they are:
{
    resolve: `gatsby-source-filesystem`,
    options: {
        path: `${__dirname}/src/posts`,
        name: 'markdown-pages'
    }
},
Back to our query:
graphql(`
    {
        allMarkdownRemark(
            sort: { order: DESC, fields: [frontmatter___date] }
            limit: 1000
        ) {
            edges {
                node {
                    frontmatter {
                        path
                    }
                }
            }
        }
    }
`
Here we are using the built-in graphql method to query all of our Markdown posts (allMarkdownRemark) which we are sorting by our frontmatter date value.
Then, we are going through each of our posts via edges > node and within each of those, searching through the frontmatter to get the path. Whew.
To help you visualize what’s going on, open up the GraphQL browser tool at http://localhost:8000/___graphql and enter this on the left hand side:
{
    allMarkdownRemark {
        // place cursor here
    }
}
If you remember from above, allMarkdownRemark holds all of our posts. To see what we can query from our posts, place your cursor in between the curly braces after allMarkDownRemark. Then, type CNTRL-SPACE and a contextual window will come up showing you all of the fields you can entry at that point in the GraphQL query. It should look like this:

The field we are interested in is edges and then node. The edges and node are pretty common when using GraphQL and Gatsby so you will get used to seeing them in your queries. Each node in this case is one of our posts so type or select edges and then node within edges so your query now looks like this:

If you use CNTRL-SPACE here you can see all of the fields in each post we can query, including frontmatter. If you type or select frontmatter, you can see the frontmatter fields that we entered into our posts:

Back to our gatsby-node.js query again:
const path = require('path')

exports.createPages = ({ actions, graphql }) => {
    const { createPage } = actions

    const postTemplate = path.resolve('src/templates/post.js')

    return graphql(``
        {
            allMarkdownRemark(
                sort: { order: DESC, fields: [frontmatter___date] }
                limit: 1000
            ) {
                edges {
                    node {
                        frontmatter {
                            path
                        }
                    }
                }
            }
        }
    ``).then(result => {
        if (result.errors) {
            return Promise.reject(result.errors)
        }

        result.data.allMarkdownRemark.edges.forEach(({ node }) => {
            createPage({
                path: node.frontmatter.path,
                component: postTemplate,
                context: {} // additional data can be passed via context
            })
        })
    })
}
Now this should be making a bit more sense. We are querying all of our posts (allMarkdownRemark), then within each post edges > node we are getting the slug or path from each via frontmatter > path.
With this returned successfully, we are taking the result (result), then looping through each post (node) in the forEach and creating a page for each post using the path we specified in our post’s frontmatter and displaying it with the component/template found at src/templates/post.js.
The context: {} is currently empty but we’ll use that later to send some more data to our post template.
While we’ve set everything up to use our post.js template, there’s nothing there yet so let’s fix that.
Create Post Template
Let’s create a template for our individual posts: in /src/ create a new directory /templates/ and then within that create a file named post.js.
Copy and paste this into that file:
import React from 'react'
import { graphql } from 'gatsby'

export default function Template({
    data // this prop will be injected by the GraphQL query below.
}) {
    const { markdownRemark } = data // data.markdownRemark holds our post data
    const { frontmatter, html } = markdownRemark
    return (
        <div className="blog-post-container">
            <div className="blog-post">
                <h1>{frontmatter.title}</h1>
                <h2>{frontmatter.date}</h2>
                <div
                    className="blog-post-content"
                    dangerouslySetInnerHTML={{ __html: html }}
                />
            </div>
        </div>
    )
}

export const pageQuery = graphql`
    query($path: String!) {
        markdownRemark(frontmatter: { path: { eq: $path } }) {
            html
            frontmatter {
                date(formatString: "MMMM DD, YYYY")
                path
                title
                image
            }
        }
    }
`
Save the file and visit http://localhost:8000/posts/my-first-post (or whatever the name of one of your posts is) and you should see your post there with all of its content.
If you’re seeing an error in your terminal, try using
CNTRL-Cand restarting usinggatsby develop.
Right, so what’s going on here, then? This is just a normal React component to display our individual posts but there are a few things you may not have seen before.
The first thing to point out is the data prop that the component is receiving is the default prop sent to our Template component via the pageQuery at the bottom. Any query on a page or post template will return the data prop to it’s component. It took a while for this to click for me but once you get it, it makes perfect sense and it is really cool because all of that lovely data is there for you to use.
The second important thing to point out is that since we are displaying this data from our posts, we need to query for that data in the template file that is showing the post. This is a requirement of Gatsby: GraphQL queries must originate from either template or page files.
You might be asking: why do we need to query posts again? I thought we queried them already in gatsby-node.js? That is correct…we did query our posts in gatsby-node.js but that was only to get the posts’ paths to generate all of our post pages. We need to query the individual post data on this page so that it is available to use in our template.
To clarify: there is the initial query in gatsby-node.js that queries our posts’ paths to generate the individual post pages, and then an additional query for each individual post to get that posts’ data to display in the post.js template for each post.
The initial query sends the individual post template some data we can use to narrow down our individual post query to just that posts’ data. Let’s look at the query in your post.js template again:
export const pageQuery = graphql`
    query($path: String!) {
        markdownRemark(frontmatter: { path: { eq: $path } }) {
            html
            frontmatter {
                date(formatString: "MMMM DD, YYYY")
                path
                title
                image
            }
        }
    }
`
^^ this is saying: for our query, we should receive the path value from gatsby-node.js and it should be a string. Then, the next line is saying that if the path equals the path of the post we are on, then get the html (the post content) and then the frontmatter data. This way, we are only querying the data we need for each post. Pretty clever, Gatsby! And this is why we need both the initial query and the individual post query as each requires different data to be returned.
If you had more frontmatter fields, you could query for them by adding them to the query.
Or you could query additional built-in fields. Try adding the id field like so:
export const pageQuery = graphql`
    query($path: String!) {
        markdownRemark(frontmatter: { path: { eq: $path } }) {
            id
            html
            frontmatter {
                date(formatString: "MMMM DD, YYYY")
                path
                title
                image
            }
        }
    }
`
Then above in post.js, let’s add this id as a className on our container element so change this:
const { frontmatter, html } = markdownRemark
    return (
        <div className="blog-post-container">
        //...
to this:
const { frontmatter, html, id } = markdownRemark
    return (
        <div className={`blog-post-container ${id}`}>
Save post.js and if you inspect your blog post with Chrome Dev Tools, you should see this id added as a class:
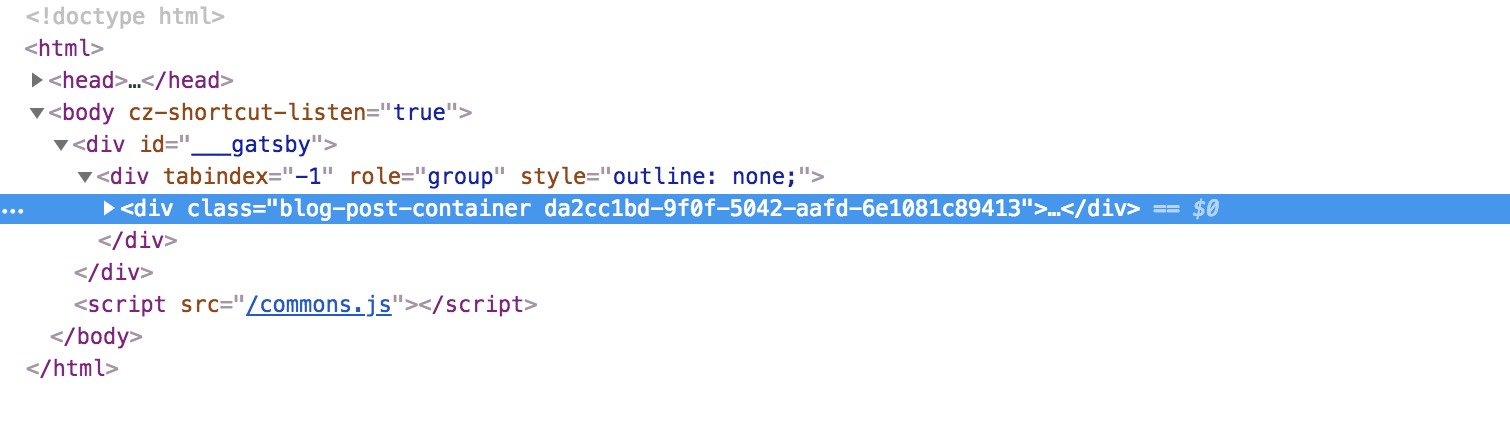
Sweetness.
Adding a Featured Image
Now let’s add a featured image. We’ll use the frontmatter > image data as a featured image for our post.
We’ll need to import the image component from Gatsby so at the top of your post.js file, add this import:
import React from 'react'
import { graphql } from 'gatsby'
import Img from 'gatsby-image'
First, we have to grab the image in our query, so add this to the query at the bottom of post.js:
export const pageQuery = graphql`
    query($path: String!) {
        markdownRemark(frontmatter: { path: { eq: $path } }) {
            id
            html
            frontmatter {
                date(formatString: "MMMM DD, YYYY")
                path
                title
                image {
                    childImageSharp {
                        sizes(maxWidth: 1200) {
                            ...GatsbyImageSharpSizes
                        }
                    }
                }
            }
        }
    }
`
^^ This grabs our image path from frontmatter and uses the built-in gatsby-transformer-sharp and gatsby-plugin-sharp to optimize the image to use in our post.
For more on image plugins and working with images in Gatsby, see the Gatsby docs.
Let’s insert our image: below our post title and date, we’ll add the following:
    return (
        <div className={``blog-post-container ${id}``}>
            <div className="blog-post">
                <h1>{frontmatter.title}</h1>
                <h2>{frontmatter.date}</h2>
                {frontmatter.image && (
                    <div className="post-image">
                        <Img sizes={frontmatter.image.childImageSharp.sizes} />
                    </div>
                )}
                //...
Notice we’ve included the check to see if there is an image with {frontmatter.image && and then if so, display our div and image. It’s important to add conditional checks like these in case you forget to include the image in frontmatter or if the image doesn’t resolve then your post will still load.
Displaying Post Content
Here’s where the actual post content is being displayed in our post.js template:
<div
    className="blog-post-content"
    dangerouslySetInnerHTML={{ __html: html }}
/>
The dangerouslySetInnerHTML is React’s replacement for using innerHTML in the browser DOM.
It’s there to remind you that it is dangerous to display content this way although in Gatsby this is the preferred method for spitting out the HTML or Markdown from our posts.
Still, I never like seeing dangerous anything in my components as it makes me feel like I’m doing something wrong. As a personal preference, I use the html-react-parser plugin to render HTML content without having to use dangerouslySetInnerHTML.
Install html-react-parser with this at the root of your project:
npm install html-react-parser --save
Then, import it into your post.js template like so:
import React from 'react'
import { graphql } from 'gatsby'
import Img from 'gatsby-image'
import Parser from 'html-react-parser'
We can then use the Parser method on our post content so update our template with this:
<div className="blog-post-content">{Parser(html)}</div>
To me, this is a lot cleaner and it is more descriptive of what’s actually going on. If you visit your post at http://localhost:8000/posts/my-first-post it should display just as before.
Using html-react-parser is just my personal preference so if you want to keep using dangerouslySetInnerHTML, go right ahead but I will be using html-react-parser in this tutorial.
This is a pretty bare-bones post template that you can customize further. Remember, if you want to grab any more fields provided by Gatsby’s GraphQL method, you can see what’s available using http://localhost:8000/___graphql. Then, be sure to add the field(s) you want to query in the post.js template. You’ll need to restart Gatsby but then your new field data will be available to you in the data prop sent to your post template.
Displaying A List of Posts
You want a list of your posts with links, don’t you? Of course you do. Let’s create a page posts.js in /src/pages/.
Place this code in posts.js:
import React from 'react'
import { graphql, Link } from 'gatsby'

const PostLink = ({ post }) => (
    <div>
        <Link to={post.frontmatter.path}>
            {post.frontmatter.title} ({post.frontmatter.date})
        </Link>
    </div>
)

const IndexPage = ({
    data: {
        allMarkdownRemark: { edges }
    }
}) => {
    const Posts = edges
        .filter(edge => !!edge.node.frontmatter.date)
        .map(edge => <PostLink key={edge.node.id} post={edge.node} />)

    return <div>{Posts}</div>
}

export default IndexPage

export const pageQuery = graphql``
    query {
        allMarkdownRemark(sort: { order: DESC, fields: [frontmatter___date] }) {
            edges {
                node {
                    id
                    excerpt(pruneLength: 250)
                    frontmatter {
                        date(formatString: "MMMM DD, YYYY")
                        path
                        title
                    }
                }
            }
        }
    }
``
This is copied almost identically from the Gatsby docs on adding a list of Markdown posts — the only difference is that I’m including the PostLink component on this page for convenience. If you are going to use this component elsewhere, split it out into it’s own component file as instructed in the docs.
Now, visit your newly created page at: http://localhost:8000/posts and you will see a list of posts with links in reverse chronological order!
Adding a Default Layout
If you view /pages/index.js you will see that imports Layout from ../components/layout.js which adds a default header and provides some basic styling as shown here:
const IndexPage = () => (
    <Layout>
        <SEO title="Home" keywords={['gatsby', 'application', 'react']} />
        <h1>Hello, world!</h1>
        <p>Welcome to your new Gatsby site.</p>
        <p>Now go build something great.</p>
        <div style={{ maxWidth: '300px', marginBottom: '1.45rem' }}>
            <Image />
        </div>
        <Link to="/page-2/">Go to page 2</Link>
    </Layout>
)
Let’s include that Layout component for our post.js template and our posts.js page by importing it and then wrapping our content with it.
In post.js, your return statement in your Template component should look like this:
return (
    <Layout>
        <div className={``blog-post-container ${id}``}>
            <div className="blog-post">
                <h1>{frontmatter.title}</h1>
                <h2>{frontmatter.date}</h2>
                {frontmatter.image && (
                    <div className="post-image">
                        <Img
                            sizes={frontmatter.image.childImageSharp.sizes}
                        />
                    </div>
                )}
                <div className="blog-post-content">{Parser(html)}</div>
            </div>
        </div>
    </Layout>
)
If you visit one of your posts now, it will have include the default header and add the styles included with the Layout component.
Now, import the Layout component and add the <Layout></Layout> elements wrapping the content on your posts.js page. Your return() statement should look like this:
return (
    <Layout>
        <div>{Posts}</div>
    </Layout>
)
And now if you view your /posts/ page, you’ll have the default header and some basic styling as well.
Add Excerpts to the Post List Page
Let’s add excerpts to our posts.js page.
First, let’s change the PostLink component so that we have some h3 elements for our post titles:
const PostLink = ({ post }) => (
    <h3>
        <Link to={post.frontmatter.path}>
            {post.frontmatter.title} ({post.frontmatter.date})
        </Link>
    </h3>
)
Next, let’s add excerpts to our post list by updating what’s returned from using the map method on our post nodes:
const Posts = edges
.filter(edge => !!edge.node.frontmatter.date)
.map(edge => (
    <li key={edge.node.id}>
        <PostLink post={edge.node} />
        <div className="post-excerpt">{edge.node.excerpt}</div>
    </li>
))
We’re just grabbing the excerpt that is already provided by the query on the bottom of the page. Notice also that we moved the key attribute up to the <li> element so that React stays happy by giving each element in our map function a unique identifier.
We need to update our return to show our post list so let’s change the <div> into a <ul> to wrap our individual <li> items:
return (
    <Layout>
        <ul className="post-list" style={styles}>
            {Posts}
        </ul>
    </Layout>
)
Finally, you’ll see I added some inline styles so below the default export, add this:
const styles = {
    listStyleType: 'none',
    maxWidth: 630,
    margin: '0 auto'
}
Now we have a centered list of posts with links and excerpts!
There are a cornucopia of solutions for CSS styling in React components: inline styles, CSS/Sass imports, CSS in JS, Styled Components and each one has its pros and cons. People seem highly opinionated about CSS in React so my advice is to to research on your own and find the CSS solution that works best for you and your specific project.
Adding Post Meta/SEO with React Helmet
In the last step in our tutorial, we need to add proper site and post meta to our document <head> and in Gatsby (and React) this is done with the Helmet component which is provided to us by the Gatsby starter.
First, we’ll need to import Helmet so at the top of your post.js:
import Helmet from 'react-helmet'
Then, to fill out some of our meta fields, we’ll need to get the current page location which is conveniently provided to us as a prop by Gatsby.
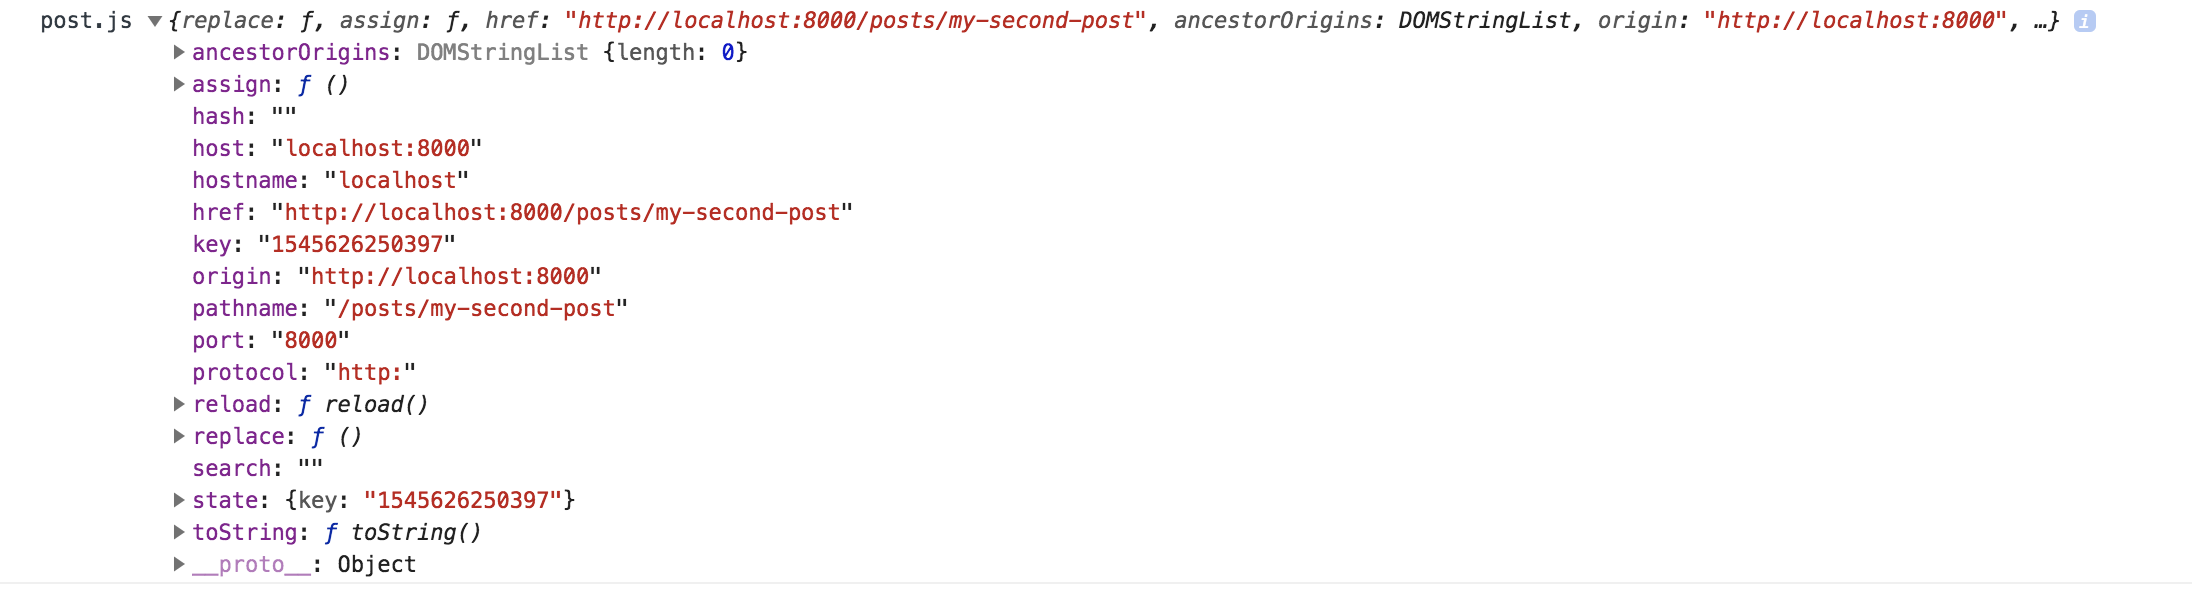
So let’s add the location prop to our Template component and then we’ll log it to the console:
export default function Template({ data, location }) {
    console.log('post.js', location)
If you visit one of your posts and then open your browser console, you should see something like this:
We’ll need the origin parameter so let’s put that in a variable:
const { origin } = location
And we’ll need our feature image source so let’s put that in a variable as well to make it easier to use:
const imageSrc = frontmatter.image.childImageSharp.sizes.src
Let’s add excerpt to our graphql query on the page so that we can use it in our meta tags:
export const pageQuery = graphql``
    query($path: String!) {
        markdownRemark(frontmatter: { path: { eq: $path } }) {
            id
            html
            excerpt(pruneLength: 100)
            frontmatter {
                //...
                ``
You can change the excerpt prune length to whatever you like.
Now we have everything we need to fill out our Helmet component so let’s add this to our post.js component:
<Helmet>
    {/* General tags */}
    <title>My Awesome site - {frontmatter.title}</title>
    <meta name="description" content={excerpt} />
    <meta name="image" content={origin + imageSrc} />

    {/* OpenGraph tags */}
    <meta
        property="og:url"
        content={``${location.origin}${location.pathname}``}
    />
    <meta property="og:type" content="article" />
    <meta property="og:title" content={frontmatter.title} />
    <meta property="og:description" content={excerpt} />
    <meta property="og:image" content={origin + imageSrc} />

    {/* Twitter Card tags */}
    <meta name="twitter:card" content="summary_large_image" />
    <meta name="twitter:creator" content="joshuaiz" />
    <meta name="twitter:title" content={frontmatter.title} />
    <meta name="twitter:description" content={excerpt} />
    <meta name="twitter:image" content={origin + imageSrc} />
</Helmet>
If you try to visit your post, you’ll get an error because we need a wrapping element so enclose all of your jsx in post.js with a <div></div> like so:
<div>
    <Helmet>
        //...
    </Helmet>
    <Layout>
        //...
    </Layout>
</div>
Now if you visit your post, then open Chrome Dev Tools and inspect the <head></head> you’ll see all of your meta tags populated with our post data! Your post(s) are ready to be searched, crawled, and shared!
Wrapping Up
Hopefully this was a clear introduction into how to create a Gatsby blog using Markdown files. There’s lots more you can add, customize, and learn:
- additional static pages
- nav menu
- footer
- sidebar
- logo
- styling
- home page
- more complex GraphQL queries
- generating pages from Markdown
- adding pagination
…and much more.
Grab the code
Code for this demo can be found here:
https://github.com/joshuaiz/mddemo
I encourage you to visit the Gatsby docs, and dive deeper to customize your site even more.
If you have any specific questions about this tutorial, you can file an issue at the code repo above or contact me via the footer of this page.