
After recently redesigning my site at joshuaiz.com with Next.js, Tailwind CSS and MDX, there was one feature that was a must for me to include: automatically Tweet any new posts to Twitter with a link and image.
If you are deploying your site’s posts or pages using static files in a GitHub repo, I’ll show you how to Tweet any new posts with an image automatically on commit but only with specific text in your commit message. You can update your site and posts and then Tweet whenever you are ready!
Where to start?
In trying to figure out a way to accomplish this automation, there were several potential pathways to go down: Next.js serverless functions, GitHub webhooks, GitHub Actions, or just post a Tweet manually. Which one to choose?
GitHub Actions to the rescue
GitHub Actions seemed like the most logical place to start and since I hadn’t had any experience with Actions it would be a great way to learn. And I was right.
There is an existing Action for sending a Tweet on push and while I could get it to work and send a simple text Tweet, there wasn’t an easy way to add an image or customize the message.
What’s more, I wanted to be able to conditionally run the action only if I am committing a new post to the repo. While there were several other examples of Tweeting using GitHub Actions which definitely helped, they were either incomplete or didn’t suit my needs.
What I ended up with was a custom GitHub Action that runs a node script to post the Tweet. The action runs conditionally based on text in the commit message ("new post") and finds the latest post in a specified directory in the repo.
With this method you can update or edit your site files by committing to your repo and only Tweet when you are ready!
After a lot of trial and error and frustration I finally got it to work so hopefully this post will help you avoid some pain points.
Without further ado, here is my custom GitHub Action which I’ll break down in detail.
name: Send Tweet on Commit
on: [push]
defaults:
  run:
    working-directory: scripts
jobs:
  build:
    runs-on: ubuntu-latest
    if: "contains(github.event.head_commit.message, 'new post')"
    steps:
      - name: Checkout repository
        uses: actions/checkout@v2
      - name: Setup Node.js
        uses: actions/setup-node@v1
        with:
          node_version: '12'
      - name: Install Node modules
        run: yarn
      - name: Tweet message
        run: node tweet.js
        env:
          CONSUMER_KEY: ${{ secrets.TWITTER_API_KEY }}
          CONSUMER_SECRET: ${{ secrets.TWITTER_API_SECRET_KEY }}
          ACCESS_TOKEN: ${{ secrets.TWITTER_ACCESS_TOKEN }}
          ACCESS_TOKEN_SECRET: ${{ secrets.TWITTER_ACCESS_TOKEN_SECRET }}
To use this workflow, add a .github/workflows directory to your local repo and save the code above to tweet.yml in that directory.
Alternatively, you can create the workflow on GitHub ([your repo] > Actions and pull the changes to your local repo.
What does the custom Action do?
The custom Action does the following:
- defines the event to trigger the action
[push] - sets the working directory which in my case is a top-level
/scriptsdirectory. This is where ournodefile lives and where we will install ournodedependencies that we need to run that file - sets a conditional to only run if we have the text
"new post"in our commit message 👍 - installs
nodeusing theactions/checkout@v2action - installs our dependencies for our
nodefile - runs our
nodefiletweet.js, passing in ourenvsecrets from GitHub
Prerequisites
-
Twitter Developer Account. You will need a Twitter Developer Account to create a new app. If you don’t already have an account, apply and wait for approval. It usually takes 24–48 hours.
-
Once approved, create a new Twitter app with
Read + Write + Direct Messagepermissions. -
Generate API Keys and Access Tokens. Important: copy these down as you will need them later.
More information about steps 1-3 can be found here along with the basics of our
nodescript which we’ll use to send the Tweet. -
GitHub repo for your site
-
Site using static files in your repo to deploy (e.g Gatsby or Next.js blog)
-
Each post is in its own directory/subdirectory by filename. For example, my posts are in
src/pages/words/my-awesome-post/index.mdx. Yours might be inpages/blog/**orpages/posts/**depending on how your project is set up.
Here is how my file structure is set up for next.js so that each post is its own directory along with associated files:
.
└── src/
    └── pages/
        └── words/
            ├── my-first-post/
            │   ├── index.mdx
            │   └── card.jpg
            └── my-second-post/
                ├── index.mdx
                └── card.jpg
I’m using
.mdxfiles for the post content but this would work with regular Markdown files as well.
Each post directory has its own index.mdx file as well as a og:image card.jpg image file at 1200x630px which is perfect for sharing on Twitter.
Setup
Add the API keys + tokens generated from your Twitter app to your GitHub repo as environment variables in [repo] > Settings > Secrets like so:
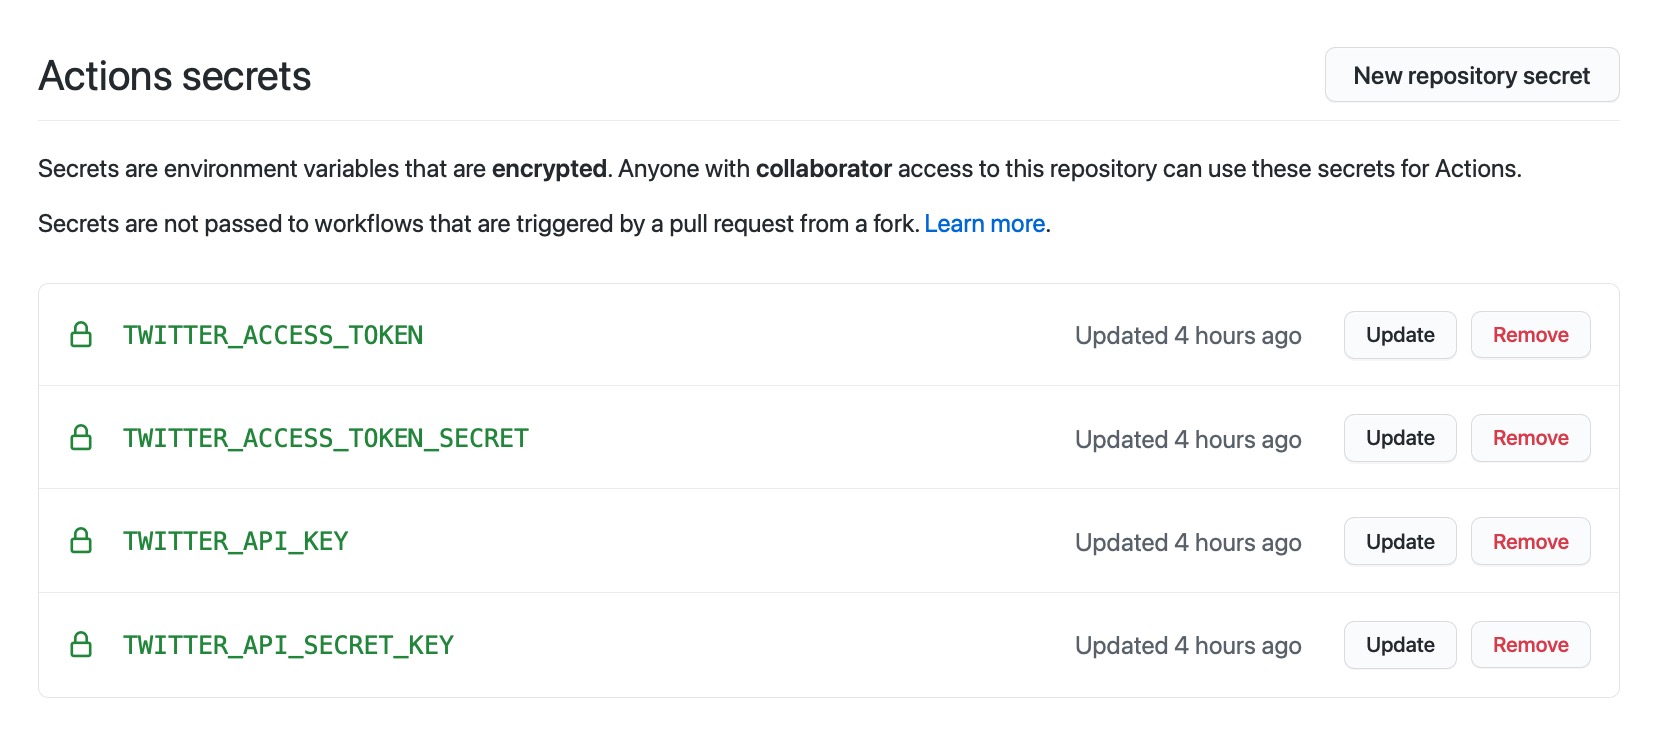
Note: make sure your app has
Read + Write + Direct Messagepermissions. If you need to change or update the permissions, you’ll have to regenerate new keys for those permissions and update them in GitHub.
Next, add a top-level /scripts folder to your repo and add a tweet.js file in that directory.
cd into /scripts and then add the dependencies we will need:
yarn add fs glob path twit extract-mdx-metadata
Let’s go through the packages we are adding in detail:
- fs: file handling utilities
- glob: allows for relative path search/matching with more complex regex patterns
- path: file path utility
- twit: Twitter API wrapper for
node; we’ll use this to send our Tweet - extract-mdx-metadata: used to grab
metaobject in.mdxfiles (optional)
Tip: if you are using regular
frontmatterin your posts instead of ametaobject, you’ll want to install gray-matter or a similar package for parsingfrontmatterinstead ofextract-mdx-metadata.
Another note: remember to add your local
/scripts/node_modulesto.gitignoreas the GitHub Action will install these for us.
Example post meta
Here is an example of the post meta in my index.mdx file:
export const meta = {
  title: "My Super Awesome Post",
  description: "This is the best post in the history of posts. You should read it.",
  date: '2021-01-09T18:05:31Z',
  authors: 'Joshua Iz',
  image: './card.jpg',
  imageAltText: 'my awesome post image description'
}

// ...post content
With this meta object you can add whatever you want and access it with extract-mdx-metadata with one caveat: you can only include strings as values. I tried with dynamic values and the extractor didn’t like that.
Node script
With our post ready and our meta added, we can write our tweet.js script to send the Tweet with an image. Here is the code in full:
const fs = require('fs')
const Twit = require('twit')
const glob = require('glob')
const { resolve, join, path } = require('path')
const extractMdxMeta = require('extract-mdx-metadata')
// require('dotenv').config()

const { CONSUMER_KEY, CONSUMER_SECRET, ACCESS_TOKEN, ACCESS_TOKEN_SECRET } = process.env

const client = new Twit({
    consumer_key: CONSUMER_KEY,
    consumer_secret: CONSUMER_SECRET,
    access_token: ACCESS_TOKEN,
    access_token_secret: ACCESS_TOKEN_SECRET,
})

const getTweetData = () => {
    let latestFile
    let sortedFiles = []
    let metaData
    glob('**/*.mdx', { cwd: '../your/posts/directory/' }, async function (er, files) {

        /**
         * map over our files and return metadata via promises to an array
         * so we can sort by date
         */
        const filesArray = (array) => {
            const promises = array.map(async (file) => {
                const content = fs.readFileSync(resolve(join('../your/posts/directory/', file)))
                return {
                    file: file,
                    meta: await extractMdxMeta(content)
                }
            })
            // make sure we are done will all files
            return Promise.all(promises);
        }

        // get our files array from above function
        let allFiles = await filesArray(files)

        // get array in format we need to sort
        let filesToSort = allFiles.map((file) => {
            let time = new Date(file.meta.date)
            return {
                file: file,
                time: time
            }
        })

        // use our helper function to get latest file
        latestFile = getLatestFile(filesToSort)

        metaData = async (latestFile) => {
            // get file path to index.mdx file for latest post
            const filePath = '../your/posts/directory/' + latestFile.file.file

            // get path before last / as this is our image directory for tweet
            const latest = filePath.substring(0, filePath.lastIndexOf('/'));

            // add back our slash
            const postDir = latest + '/'

            let postUrl = latest.split('/');
            let postPath = postUrl[postUrl.length - 1];

            // get content and then meta data
            const content = fs.readFileSync(filePath)
            const meta = await extractMdxMeta(content)

            // this invokes our main function with tweet data
            main(meta, postDir, postPath)
        }

        if (latestFile) {
            return metaData(latestFile)
        }

    })

    // function to sort files and return latest by metadata date field
    function getLatestFile(array) {
        array.sort((a, b) => b.time.getTime() - a.time.getTime())
        return array[0]
    }

    return null
}

// get our Tweet data
getTweetData()

// handle formatting tweet and posting with image
const post = (tweet, dir, postPath) => {

    // we're using the `title` value from the metadata for our Tweet content
    const post = 'New post: ' + tweet.title + ' https://joshuaiz.com/words/' + postPath

    // get alt text for image
    const tweetImageAltText = tweet.imageAltText

    // set char limit for Twitter
    const limit = 277

    // ensure Tweet is correct length, but if not let's truncate
    // and still post.
    const tweetSubstr = post.length > limit ? `${post.substring(0, limit - 3)}...` : post

    const data = {
        status: tweetSubstr,
    }

    // post a tweet with media; need to base64 encode image
    // Note: this assumes a `card.jpg` image in the same folder as post
    const b64content = fs.readFileSync(resolve(join( dir + '/card.jpg')), {
        encoding: 'base64',
    })

    // use the client to post the message
    return client.post('media/upload', { media_data: b64content }, function (err, data, response) {
        // now we can assign alt text to the media, for use by screen readers and
        // other text-based presentations and interpreters
        const mediaIdStr = data.media_id_string
        const altText = tweetImageAltText
        const meta_params = {
            media_id: mediaIdStr,
            alt_text: { text: altText },
        }

        client.post('media/metadata/create', meta_params, function (err, data, response) {
            if (!err) {
                // now we can reference the media and post a tweet (media will attach to the tweet)
                const params = { status: post, media_ids: [mediaIdStr] }

                client.post('statuses/update', params, function (err, data, response) {
                    console.log(data)
                })
            }
        })
    })
}

// our main function
const main = async (tweet, dir, postPath) => {
    try {
        console.log('Attempting to post')
        await post(tweet, dir, postPath)
        console.log('Posted!')
    } catch (err) {
        console.error(err)
    }
}
The bulk of the above script comes from the Twit docs but the new bit is the getTweetData() function.
What that function does is uses glob patterns to grab all the paths to the posts in your posts directory. Be sure to change wherever it says ../your/posts/directory to your actual posts directory. We use the cwd (current working directory) as a starting point so we can then use relative paths.
Getting the correct paths was the hardest part to figure out as we need relative paths so the script works both locally and on GitHub.
Once we have our files (posts) list, we can loop through them to get each post’s date from the post’s meta object using the extractMdxMeta() function.
Note that this glob function returns just the .mdx file path within the posts directory, e.g. my-first-post/index.mdx so that is what is added to the file value for each item in the sortedFiles array.
With the filesToSort array, we can use a simple function to sort by our metadata date stamp and then return the latest .mdx file’s path. We now have the path to the latest created file in our specified posts directory. Sweetness!
Armed with that path, we can move on to grabbing the metadata we will need for the content of our Tweet. To refresh, here’s a sample meta object from our post:
export const meta = {
  title: "My Super Awesome Post",
  description: "This is the best post in the history of posts. You should read it.",
  date: '2021-01-09T18:05:31Z',
  authors: 'Joshua Iz',
  image: './card.jpg',
  imageAltText: 'my awesome post image description'
}

// ...post content
In the metaData async function, we can reconstruct our full file path with this:
const filePath = '../your/posts/directory/' + latestFile.file.file
E.g. ../your/posts/directory/my-first-post/index.mdx
We also want to grab the post directory which is also the post slug like so:
const latest = filePath.substring(0, filePath.lastIndexOf('/'));
// get post directory for our image and post url
const postDir = latest + '/'
We then save the post’s content to a variable with:
// get post content
const content = fs.readFileSync(filePath)
And with the content we can now extract our metadata to use for our Tweet using extract-mdx-metadata:
// extract `meta` object from content
const meta = await extractMdxMeta(content)
We send that along with our post directory postDir to our main function which calls the post function to parse the metadata into the content + image for our Tweet.
In this case we are using the meta.title but you could use any value from your posts meta object (or frontmatter).
We create our post (Tweet content) with the post title and a link to the post.
With our dir (post directory) we can also reconstruct the path to our post image (card.jpg) and then base64 encode that to upload to Twitter.
From there, the Twit post function uploads our image and then an additional post call using 'media/metadata/create' matches the Tweet content status: post to our image.
And that’s it.
Usage
To use, once you have your post ready, just send a commit to your repo with "new post" anywhere in your commit message:
git commit -m "new post My first post with Tweet"
This would also work:
git commit -m "This is a new post"
Sorted. You can now post to Twitter whenever you have a new blog post automagically on commit!
Conclusion
I hope this post was helpful. If you have any questions, you can find me on Twitter: @joshuaiz.
👾